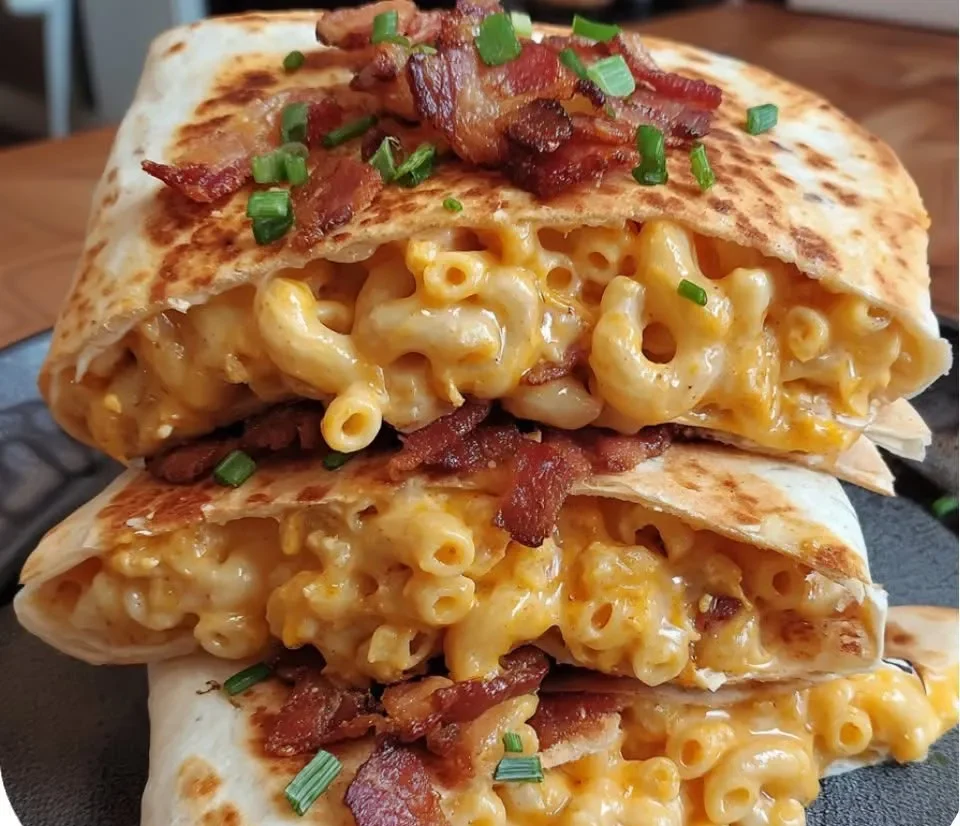
Cheesy, crispy, and bursting with ranch bacon goodness—these golden quesadillas transform leftover mac and cheese into the ultimate comfort snack or dinner!
Servings & Timing
-
Prep Time: 10 minutes
-
Cook Time: 8 minutes
-
Total Time: 18 minutes
-
Servings: 4
Dietary Badges: Kid-Approved | W-W Friendly (modifications below) | Comfort Food Classic
Ingredients
→ Filling
-
Leftover macaroni and cheese (cooked and cooled)
-
Crispy bacon, chopped
-
Ranch dressing
→ Wrap & Cheese
-
Large flour tortillas
-
Shredded cheddar cheese
-
Shredded mozzarella cheese
→ Cooking & Garnish
-
Olive oil
-
Green onions, chopped
Instructions
-
Mix the filling – In a bowl, combine macaroni and cheese, crispy bacon, and ranch dressing. Stir until creamy and combined.
-
Assemble quesadillas – Lay a tortilla flat. Spread filling on one half, sprinkle both cheeses over top. Fold in half.
-
Cook quesadillas – In a skillet over medium heat, drizzle olive oil. Cook each quesadilla 3–4 minutes per side, until golden and crisp.
-
Slice & serve – Cut into wedges, sprinkle with green onions, and serve immediately.
Quick Tips
-
Add extra cheese inside for better “glue” and more melt!
-
For best results, don’t overstuff—less is more with these gooey guys.
-
Let quesadillas cool 2–3 minutes before slicing to avoid cheese spills.
💡 Introduction
What do you get when you mix everyone’s favorite mac & cheese with crispy bacon and tangy ranch, then wrap it in a golden tortilla? Pure bliss, that’s what. These Crispy Bacon Ranch Mac & Cheese Quesadillas are indulgent, clever, and downright addictive.
This recipe was a late-night invention (thanks to a leftover box of mac & cheese in my fridge), and it’s become a hit with my family—and my W-W clients with a few healthy tweaks.
Step-by-Step Cooking Guide
🧀 Mix the Mac Filling
In a bowl, combine your leftover mac and cheese with chopped bacon and a few spoonfuls of ranch dressing. It should be creamy, not runny—add ranch slowly so it doesn’t overpower.
Tip: Use chilled mac for easier handling—it won’t ooze out when cooking.
🌮 Assemble the Quesadilla
Spread the mac & cheese filling onto half of a tortilla. Top with a mix of cheddar and mozzarella—cheddar gives flavor, mozzarella gives melt. Fold it like a taco, pressing down gently.
Tip: Don’t overfill! About ⅓ cup of filling per quesadilla is plenty.
🔥 Crisp to Perfection
Heat olive oil in a skillet. Cook each side until golden brown and crispy, about 3–4 minutes per side. Press gently with a spatula for even browning.
Tip: Use a cast iron pan if you have one—it gives the best crunch.
Ingredient Deep Dive & Substitutions
-
Macaroni & Cheese: Any kind works—boxed, homemade, or leftover. Creamier versions melt better inside the tortilla.
-
Bacon: Turkey bacon or plant-based bacon work too. Pre-cook and crisp it well!
-
Ranch Dressing: Full-fat or light—just enough to coat, not soak. Greek yogurt ranch is a great low-cal option.
-
Tortillas: Large burrito-style or low-carb wraps for a W-W friendly swap.
-
Cheese: Blend of cheddar and mozzarella is classic. Try pepper jack or gouda for fun twists.
-
Green Onions: Add a fresh, oniony pop. Can sub chives or skip entirely.
Variations & Serving Suggestions
Flavor Variations
-
🌶️ Add jalapeños or hot sauce to the mix for a spicy twist.
-
🧄 Mix in garlic powder or onion powder for more punch.
-
🍗 Add shredded rotisserie chicken for extra protein.
Dietary Tweaks
-
W-W Friendly:
-
Use 2-ingredient dough tortillas or low-carb wraps
-
Light mac & cheese or cauliflower-based version
-
Turkey bacon and light shredded cheese
-
Greek yogurt ranch for fewer points
-
-
Vegetarian: Skip bacon, add roasted mushrooms or caramelized onions.
Serving Ideas
-
Pair with extra ranch or BBQ sauce for dipping.
-
Serve with a side salad to lighten the plate.
-
Great for lunchboxes or party platters—just reheat in a toaster oven!
Storage, Reheating & Make-Ahead
Storage
-
Store leftover quesadilla wedges in an airtight container for up to 3 days.
Reheating
-
Reheat in a skillet or air fryer to bring back the crisp! Microwave works but softens the tortilla.
Freezing
-
Not ideal—mac & cheese changes texture when frozen. But the filling can be prepped ahead and chilled 2 days.
Make-Ahead
-
Assemble quesadillas in the morning, refrigerate, and cook fresh in the evening.
Nutrition Info (Per Quesadilla – based on W-W friendly swaps)
-
Calories: ~340 kcal
-
Protein: 15g
-
Carbs: 28g
-
Fat: 18g
-
W-W Points (est.): 7–9 with light ingredients
-
Allergens: Dairy, Gluten (can be adapted)
FAQs
Q: Can I make this in an air fryer?
A: Yes! Cook at 375°F for 6–7 minutes, flipping halfway. Just brush lightly with oil.
Q: What’s the best ranch to use?
A: Greek yogurt ranch is a great lighter choice. Use your favorite brand, but avoid overly thin versions.
Q: Can I use leftover baked mac & cheese?
A: You can! Just break it up a bit and stir in a splash of milk or ranch to loosen before stuffing.
🧡 Kristy’s Note
Let’s be real: this is comfort food at its cheesiest, crunchiest best. I love finding fun ways to repurpose leftovers, and this recipe turns fridge finds into a crowd-pleasing treat. Perfect for a cozy weekend lunch, or cut into wedges for a party snack that disappears fast!
More Irresistible Recipes
-
Buffalo Chicken Quesadilla Wraps
-
W-W Friendly Bacon Mac Bake
-
Loaded Cauliflower Nachos (Low-Carb)
💬 Time to Get Crispy!
If you make these Crispy Bacon Ranch Mac & Cheese Quesadillas, tag me @KristyCooksHealthy and use #W-WCheesyWins. I want to see your golden brown creations! And don’t forget to drop a comment below—did your family devour these too?