Introduction: Why Air Fryer Yorkshire Pudding Works So Well
Yorkshire pudding is one of those magical recipes that looks simple—just batter and heat—but is actually driven by physics, steam, fat temperature, and timing. Traditionally baked in a screaming-hot oven, Yorkshire puddings rely on rapid heat transfer to force moisture in the batter to turn into steam, which lifts the batter upward before it sets.
An air fryer, surprisingly, is exceptionally good at this.
Because an air fryer is essentially a compact, high-powered convection oven, it delivers:
-
Faster heat-up
-
More aggressive air circulation
-
Better surface evaporation
-
More even browning
The result?
Yorkshire puddings that:
-
Rise higher
-
Set faster
-
Stay crisp longer
-
Are less prone to collapsing
Once you master this method, it’s very hard to go back to the oven.
Ingredients (Classic, Traditional Ratio)
Yorkshire pudding is built on a 1:1:1 ratio by volume. This balance is sacred.
-
2 large eggs, room temperature
-
½ cup (120 ml) whole milk, room temperature
-
½ cup (65 g) all-purpose flour, sifted
-
½ tsp salt
For the Fat (Critical!)
Choose ONE:
-
Beef dripping (traditional, best flavor)
-
Vegetable oil
-
Sunflower oil
-
Canola oil
Avoid butter or olive oil—they burn too easily at high temperatures.
You’ll need about:
-
1½–2 teaspoons fat per pudding cup
Equipment You’ll Need
-
Air fryer (basket or drawer style)
-
Metal Yorkshire pudding tin or metal ramekins
(Do NOT use silicone—ever.) -
Mixing bowl
-
Whisk (hand whisk preferred)
-
Measuring cups
-
Jug or spouted cup for pouring batter
Step 1: Understand the Batter (This Matters More Than Anything)
Yorkshire pudding batter is closer to crêpe batter than pancake batter. It should be:
-
Thin
-
Pourable
-
Smooth
-
Lump-free
Too thick → dense, bread-like pudding
Too thin → flat, brittle pudding
Step 2: Make the Batter
In a bowl:
-
Add the eggs and salt
-
Whisk briefly to break them up
-
Add the flour gradually while whisking
At this stage, the mixture will look thick and lumpy—this is normal.
Now:
4. Slowly pour in the milk while whisking continuously
Whisk for about 1–2 minutes until:
-
Completely smooth
-
No visible flour lumps
-
Consistency of single cream (light cream)
Step 3: Rest the Batter (Non-Negotiable)
Cover the batter and rest it for at least 30 minutes, ideally 1–2 hours at room temperature.
Why resting works:
-
Allows flour to fully hydrate
-
Relaxes gluten
-
Improves steam formation
-
Leads to better rise and structure
You can even rest it overnight in the fridge—just bring it back to room temperature before cooking.
Step 4: Preheat the Air Fryer AND the Tins
This is the secret most people miss.
-
Place your empty metal pudding tins or ramekins into the air fryer basket
-
Add 1½–2 teaspoons fat into each cup
-
Preheat the air fryer to 200°C / 390°F for 5–7 minutes
You want the fat:
-
Shimmering
-
Almost smoking
-
Visibly hot
If the fat isn’t hot enough, the batter won’t rise.
Step 5: Pour the Batter (Move Fast!)
Once the fat is screaming hot:
-
Carefully pull out the basket
-
Working quickly, pour batter into each cup
Fill no more than halfway.
Overfilling = no rise.
You should hear an instant sizzle when the batter hits the fat. That sound is steam being created—that’s what lifts the pudding.
Immediately return the basket to the air fryer.
Step 6: Cook Without Disturbing
Set air fryer to:
-
200°C / 390°F
-
12–15 minutes
⚠️ DO NOT OPEN THE AIR FRYER during cooking.
Opening the drawer:
-
Drops the temperature
-
Releases steam
-
Causes collapse
At around 8 minutes, you’ll see dramatic rising through the window (if yours has one). This is normal and glorious.
Step 7: Final Crisping (Optional but Excellent)
For extra crispness:
-
Reduce temperature to 180°C / 356°F
-
Cook an additional 2–3 minutes
This sets the structure and deepens the color without burning.
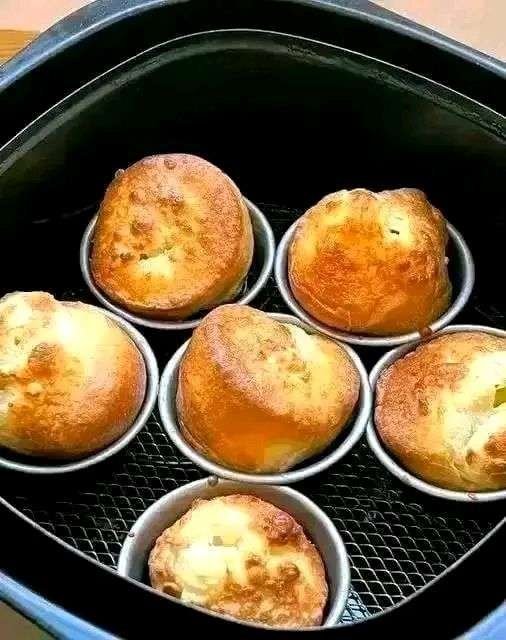
Step 8: Remove and Serve Immediately
Use tongs to lift the puddings out.
They should be:
-
Tall
-
Hollow in the center
-
Deep golden brown
-
Crisp on the outside
-
Soft and custardy inside
Serve immediately for best texture.
Why These Are Better Than Oven Yorkshire Puddings
-
Faster heat = better steam lift
-
Smaller cavity = more intense convection
-
Less heat loss = stronger rise
-
More even airflow = consistent browning
Air fryers remove the guesswork.
Common Problems & Fixes
❌ Flat puddings
-
Fat not hot enough
-
Batter too thick
-
Opened air fryer too early
❌ Burnt bottoms
-
Too much fat
-
Air fryer runs hot → reduce temp by 10–15°C
❌ Dense or bready texture
-
Batter not rested
-
Overmixed after resting
-
Flour too strong (use plain/all-purpose)
Flavor Variations (Optional but Fun)
-
Herb Yorkshire: Add thyme or rosemary to the fat
-
Cheese Yorkshire: Sprinkle grated cheddar in the last 3 minutes
-
Mini toad-in-the-hole: Add a cooked sausage slice before batter
-
Garlic fat: Infuse oil with garlic, then strain before heating
Storage & Reheating
Yorkshire puddings are best fresh, but:
Store:
-
Airtight container
-
Room temperature for 1 day
Reheat:
-
Air fryer at 180°C / 356°F
-
3–4 minutes
-
Never microwave (they go rubbery)
Final Thoughts
Air fryer Yorkshire puddings are not a shortcut—they’re an upgrade. Once you understand heat, fat, and steam, this method becomes foolproof. Whether you’re serving them with a full roast dinner, sausages and gravy, or just eating them hot and plain (no judgment), these puddings deliver height, crunch, and that unmistakable hollow center every single time.