Introduction: The Appetizer That Feels Like a Celebration
Some foods don’t just taste good — they feel like an event. A blooming onion is one of them. It lands on the table golden and dramatic, petals fanned out like a crispy flower, and suddenly everyone’s reaching in, laughing, dipping, and stealing “just one more piece.”
For years, blooming onions felt like something you could only enjoy at a restaurant. Deep fryers, gallons of oil, complicated setups — not exactly weeknight-friendly. But then the air fryer changed everything.
This Air Fryer Blooming Onion delivers everything you love:
-
Crunchy, seasoned exterior
-
Tender, sweet onion inside
-
That iconic pull-apart texture
-
And none of the greasy aftermath
If I had known how easy this was, I would have made it years ago — and once you try it, you’ll feel the same way.
Why the Air Fryer Version Is a Game Changer
Traditional blooming onions are submerged in hot oil, which gives crunch but also heaviness. The air fryer, on the other hand:
-
Uses hot circulating air to crisp every petal
-
Requires minimal oil
-
Keeps the onion lighter and less greasy
-
Makes cleanup almost effortless
You still get that crave-worthy crunch — just without the fryer smell lingering for days.
Ingredients (Serves 2–4)
For the Blooming Onion
-
1 large sweet onion (Vidalia or yellow onion works best)
-
1 cup all-purpose flour
-
1 teaspoon paprika
-
1 teaspoon garlic powder
-
½ teaspoon onion powder
-
½ teaspoon salt
-
½ teaspoon black pepper
-
¼ teaspoon cayenne pepper (optional, for heat)
For the Egg Wash
-
2 large eggs
-
½ cup milk
For Crisping
-
Cooking spray or olive oil spray
Optional Dipping Sauce (Highly Recommended)
-
½ cup mayonnaise
-
2 tablespoons ketchup
-
1 teaspoon prepared horseradish
-
½ teaspoon paprika
-
¼ teaspoon garlic powder
-
Salt to taste
Step 1: Preparing the Onion (The Most Important Step)
Peel the onion and trim just a small slice off the top — do not cut off the root end. The root is what holds the onion together and creates the “bloom.”
Place the onion root-side down on a cutting board. Starting about ½ inch from the root, make vertical cuts downward, slicing into quarters. Then slice each quarter into thirds or fourths until you have evenly spaced “petals.”
Carefully turn the onion over and gently spread the layers apart with your fingers. Don’t rush this — patience here creates that dramatic bloom later.
Rinse briefly under cold water to loosen the petals further, then pat dry thoroughly with paper towels.
Step 2: Mixing the Seasoned Flour
In a wide bowl, whisk together:
-
Flour
-
Paprika
-
Garlic powder
-
Onion powder
-
Salt
-
Pepper
-
Cayenne (if using)
This seasoning blend is what gives the onion that classic steakhouse flavor — savory, slightly smoky, and deeply satisfying.
Step 3: Egg Wash for Maximum Adhesion
In a separate bowl, whisk together the eggs and milk until smooth.
The egg wash acts as the glue that helps the seasoned flour cling to every onion petal. This is key for even crisping.
Step 4: Coating the Onion (Messy but Worth It)
Place the onion into the flour mixture, spooning flour into every crevice. Turn it gently to coat thoroughly.
Next, dip the onion into the egg wash, making sure it flows between the petals.
Then — yes — coat it again in the flour mixture. This double coating is what creates that thick, crispy crust once it hits the air fryer.
Shake off any excess flour, but don’t be too aggressive. Those craggy bits are crunch gold.
Step 5: Air Frying to Golden Perfection
Preheat your air fryer to 375°F (190°C).
Lightly spray the air fryer basket with oil. Place the onion root-side down in the basket. If your air fryer is small, gently compress the petals just enough to fit — they’ll open back up as they cook.
Spray the entire onion generously with cooking spray, making sure to coat the tops and sides.
Air fry for:
-
10 minutes, then carefully spray again
-
Continue cooking for 8–10 more minutes
You’re looking for:
-
Deep golden brown color
-
Crisp edges on each petal
-
A tender interior when pierced with a knife
If some tips brown faster than others, tent loosely with foil for the last few minutes.
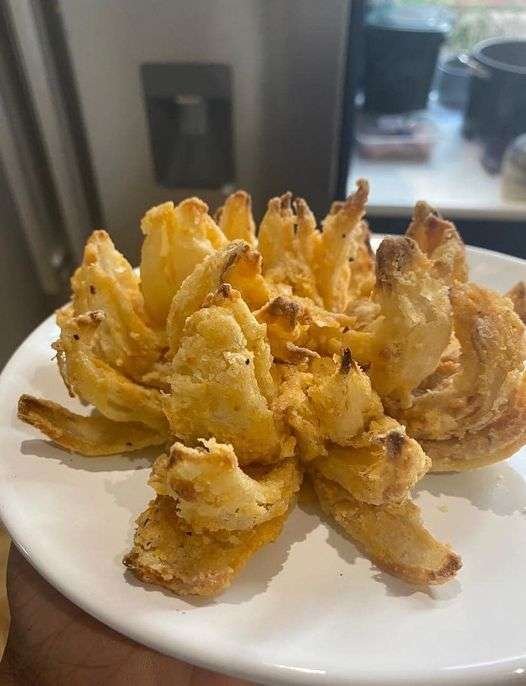
Step 6: Rest and Bloom
Remove the onion carefully and let it rest for 3–5 minutes. This allows the coating to set and the petals to fully bloom.
Transfer to a plate and admire your work — this is not just food, it’s a centerpiece.
Optional Dipping Sauce (Do Not Skip)
Mix all sauce ingredients in a small bowl until smooth. Chill for 10 minutes if you can — the flavors deepen beautifully.
This creamy, tangy sauce balances the crisp onion perfectly.
How to Serve It
-
As a game-day appetizer
-
As a shared starter for dinner
-
Alongside burgers or grilled chicken
-
Cut into halves for individual portions
Serve hot for maximum crunch.
Troubleshooting & Pro Tips
Not crispy enough?
-
Use more oil spray
-
Cook 2–3 minutes longer
-
Make sure the flour coating is thorough
Petals sticking together?
-
Gently separate after cutting
-
Rinse briefly in cold water
Too dark too fast?
-
Lower temperature to 360°F
-
Cover tips with foil
Make-Ahead Tips
You can prep the onion and coating up to 4 hours ahead, store covered in the fridge, and air fry just before serving.
Leftovers can be reheated in the air fryer at 350°F for 4–5 minutes, though it’s best fresh.
Why This Recipe Keeps People Coming Back
This blooming onion checks every box:
-
Easy enough for beginners
-
Impressive enough for guests
-
Familiar yet exciting
-
Comforting without being heavy
It’s the kind of recipe people ask for again — and that’s what makes it special.
One Last Thing ❤️
If this recipe made you smile, crave comfort food, or say “I should’ve tried this sooner”, please save it, share it, and keep coming back for more. Recipes like this are made to be enjoyed together — and I’d love to keep cooking with you.
Thank you for being here and for letting my recipes be part of your table.