Why the Air Fryer Is the Best Way to Bake Sweet Potatoes
Traditional oven baking works, sure, but it has drawbacks:
-
Takes forever to preheat
-
Heats up the whole kitchen
-
Often results in dry centers or leathery skins
The air fryer fixes all of that.
Here’s why it works so well:
-
Rapid hot air circulation crisps the skin evenly
-
High heat converts sweet potato starches into natural sugars
-
Moisture inside turns to steam, fluffing the flesh from the inside out
-
Shorter cook time means better texture control
The result?
✨ Creamy, cloud-like interior
✨ Thin, blistered, crispy skin
✨ Deep, caramelized flavor
Ingredients (Minimal, On Purpose)
You only need a few things, because sweet potatoes already have excellent flavor.
Basic Ingredients
-
Sweet potatoes (orange-fleshed varieties work best)
-
Olive oil or avocado oil (optional, but recommended)
-
Kosher salt or flaky sea salt
That’s it.
No foil.
No parchment.
No water bath.
No poking holes like it’s 1997.
Choosing the Right Sweet Potatoes
Not all sweet potatoes are created equal.
Best Size
-
Medium to large (8–12 oz each)
-
Uniform size so they cook evenly
Very small ones dry out too fast.
Extra-huge ones cook unevenly unless you adjust the time.
What to Look For
-
Firm, smooth skin
-
No soft spots or wrinkles
-
Deep orange flesh (usually labeled “garnet” or “jewel”)
Avoid pale, dry-looking potatoes — they’ll be bland and chalky.
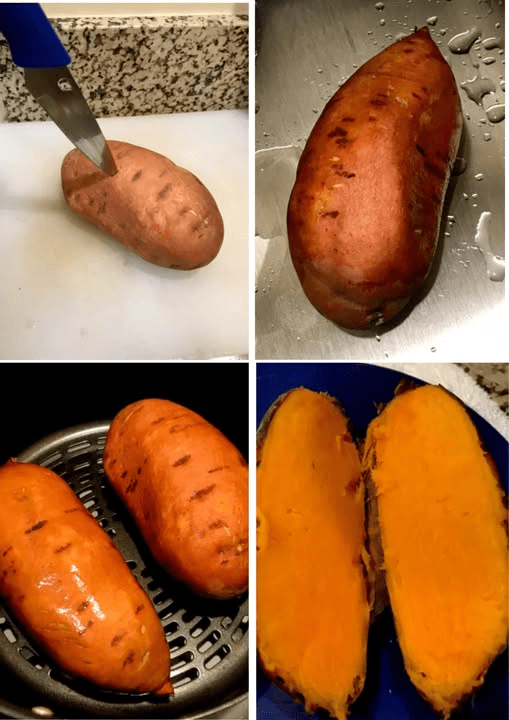
Step 1: Wash (But Don’t Peel)
Rinse the sweet potatoes under cold running water and scrub them gently with a brush or towel to remove dirt.
Do not peel them.
The skin:
-
Protects moisture
-
Gets crispy and delicious
-
Holds the potato together as steam builds inside
Pat them completely dry. Moisture on the skin = soggy results.
Step 2: Oil + Salt (The Flavor Foundation)
Rub each sweet potato lightly with oil — about ½ teaspoon per potato.
This does three things:
-
Helps the skin crisp
-
Promotes even browning
-
Improves flavor dramatically
Then sprinkle with salt.
Don’t be shy — salt enhances the sweetness once cooked.
Optional additions (use sparingly):
-
Smoked salt
-
Garlic powder
-
Paprika
Avoid sugar or sweet seasonings at this stage — they burn.
Step 3: Preheat the Air Fryer (Yes, It Matters)
Preheat your air fryer to 390°F (200°C) for 3–5 minutes.
Why this matters:
-
Immediate heat jumpstarts caramelization
-
Prevents rubbery skin
-
Ensures even cooking from the start
If your air fryer doesn’t have a preheat function, just run it empty for a few minutes.
Step 4: Air Fry to Perfection
Placement
-
Place sweet potatoes directly in the basket
-
Leave space between them
-
Do NOT stack
Air needs to circulate freely.
Temperature & Time
-
390°F (200°C)
-
35–45 minutes, depending on size
Flip Once
At about the 20-minute mark, flip the sweet potatoes.
This ensures:
-
Even browning
-
Uniform crispiness
-
No soggy underside
How to Tell When They’re Done
Ignore the clock. Trust the signs.
Visual Cues
-
Skin is puffed, blistered, and darker
-
Natural sugars may be bubbling out
Touch Test
-
Gently squeeze with tongs
-
Should feel soft and yielding
Knife Test
-
A knife should slide in with zero resistance
-
If it catches, give it 5 more minutes
Internal temp will usually be around 205–210°F when perfect.
Step 5: Rest (The Secret Step Everyone Skips)
Remove the sweet potatoes and let them rest 5 minutes.
Why?
-
Steam redistributes inside
-
Flesh becomes lighter and fluffier
-
Prevents watery texture when cut
Skipping this step is the #1 reason people think their sweet potatoes are “too wet.”
How to Cut and Serve for Maximum Fluffiness
Instead of slicing cleanly, do this:
-
Cut a slit lengthwise
-
Gently push the ends toward each other
-
Watch the inside bloom open like a pillow
This breaks up the fibers and creates that classic fluffy texture.
Texture Breakdown: Why This Method Works
Inside the sweet potato:
-
Heat converts starch → sugar
-
Water turns into steam
-
Steam pushes outward, separating cells
The skin traps steam just long enough before crisping, creating:
-
Fluffy interior
-
Crisp exterior
-
Deep sweetness without added sugar
Oven baking often dries the outside before the inside fully steams — the air fryer hits the sweet spot.
Flavor Variations (Add After Cooking)
Sweet Options
-
Butter + cinnamon
-
Greek yogurt + honey
-
Maple syrup + flaky salt
-
Brown butter + toasted pecans
Savory Options
-
Butter + black pepper
-
Sour cream + chives
-
Tahini + lemon juice
-
Chili crisp + scallions
Meal-Style Toppings
-
Black beans, avocado, salsa
-
Pulled chicken or tofu
-
Fried egg + hot sauce
The neutral sweetness makes these insanely versatile.
Common Mistakes (Avoid These)
❌ Wrapping in foil
→ Steams the potato, no crisp skin
❌ Cooking too low
→ Gummy interior
❌ Overcrowding
→ Uneven cooking
❌ Skipping oil
→ Tough, papery skin
❌ Cutting immediately
→ Wet, dense texture
Storage & Reheating
Storage
-
Store cooked sweet potatoes in the fridge up to 4 days
-
Keep whole for best texture
Reheating in Air Fryer
-
350°F for 5–8 minutes
-
Skin re-crisps beautifully
Avoid microwaving unless texture doesn’t matter.
Final Thoughts
Once you make sweet potatoes this way, it’s hard to go back. The air fryer delivers everything you want:
-
Crispy skin
-
Ultra-fluffy interior
-
Concentrated sweetness
-
Minimal effort