Why Everyone Loves This Recipe
This isn’t your heavy, old-school vinegar pickle that overwhelms your taste buds. These are quick pickles, sometimes called refrigerator pickles, inspired by Mediterranean flavors—fresh herbs, gentle acidity, a hint of sweetness, and lots of crunch.
They’re:
-
Ready in 24 hours
-
Naturally vegan & gluten-free
-
Customizable with whatever vegetables you have
-
Perfect as a salad, side dish, mezze item, or sandwich topping
-
Practically foolproof
And best of all? They taste even better the longer they sit.
What You’ll Need (Ingredients)
Vegetables (Base Recipe)
You can adjust quantities, but this balance works beautifully:
-
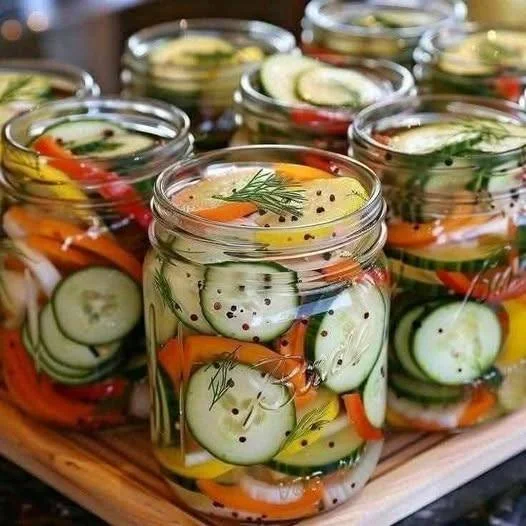
4–5 Persian or small cucumbers, thinly sliced
(English cucumbers also work; avoid waxy ones if possible) -
2 medium carrots, peeled and sliced into thin rounds or ribbons
-
1 red bell pepper, thinly sliced
-
1 yellow bell pepper, thinly sliced
-
½ medium red onion, very thinly sliced
-
Optional additions:
-
Zucchini slices
-
Radishes
-
Green beans (blanched 1 minute)
-
Cauliflower florets
-
Cherry tomatoes (halved)
-
Fresh Herbs & Aromatics
These are what give the pickles that Mediterranean soul:
-
4–6 fresh dill sprigs
-
3 cloves garlic, peeled and lightly crushed
-
1 teaspoon whole black peppercorns
-
1 teaspoon mustard seeds
-
½ teaspoon coriander seeds (optional but lovely)
-
1 bay leaf per jar (optional)
-
Fresh thyme or oregano sprigs (optional)
Pickling Brine
This brine is balanced—not too sharp, not too sweet.
-
1 cup white wine vinegar
(Apple cider vinegar also works; avoid distilled unless diluted) -
1 cup water
-
1½ tablespoons kosher salt
-
1–2 tablespoons sugar or honey (adjust to taste)
-
2 tablespoons extra virgin olive oil
(Mediterranean touch—optional but recommended)
Equipment
-
2–3 clean glass jars with lids (quart or large mason jars)
-
Medium saucepan
-
Sharp knife or mandoline
-
Cutting board
-
Measuring cups & spoons
No canning equipment needed—these are refrigerator pickles.
Step-by-Step Instructions
Step 1: Prepare the Vegetables
Wash everything thoroughly. This matters more than people think—clean vegetables = better flavor and longer shelf life.
Slice all vegetables evenly. Uniform thickness ensures:
-
Even pickling
-
Balanced texture
-
No soggy bits mixed with crunchy ones
If using onions, slice them paper-thin. Thick onion slices can overpower the brine.
Set all vegetables aside in a large bowl.
Step 2: Pack the Jars
This is where the magic starts.
-
Place garlic cloves, peppercorns, mustard seeds, coriander seeds, bay leaf, and herbs at the bottom of each jar.
-
Begin layering vegetables:
-
Cucumbers
-
Carrots
-
Peppers
-
Onions
-
-
Pack them snug but not crushed. You want space for the brine to circulate.
Finish with a sprig of dill on top—it looks gorgeous and perfumes the jar.
Step 3: Make the Brine
In a saucepan, combine:
-
Vinegar
-
Water
-
Salt
-
Sugar or honey
Heat gently over medium heat, stirring just until:
-
Salt dissolves
-
Sugar melts completely
Do not boil aggressively. Once dissolved, remove from heat and stir in olive oil.
Taste the brine:
-
Too sharp? Add a touch more sugar.
-
Too mild? Splash in more vinegar.
This step is your flavor control moment.
Step 4: Pour & Seal
Carefully pour the warm (not boiling) brine over the vegetables until completely submerged.
-
Tap jars gently to release air bubbles
-
Top off with more brine if needed
-
Seal with lids
Let jars cool at room temperature for about 30 minutes.
Step 5: Refrigerate & Wait (The Hardest Part)
Place jars in the refrigerator.
-
Minimum wait: 12 hours
-
Best flavor: 24–48 hours
-
Peak deliciousness: 3–5 days
They’ll continue to improve for up to 2–3 weeks when kept refrigerated.
How to Serve These Pickled Vegetables
These jar pickles are wildly versatile:
-
As a summer salad with olive oil & feta
-
On grilled meats or fish
-
In wraps, gyros, and sandwiches
-
As part of a mezze platter
-
Chopped into grain bowls
-
Straight from the jar (no shame 😄)
Pro tip: Spoon some brine over roasted potatoes or chickpeas—instant flavor boost.
Variations You’ll Love
Spicy Mediterranean
Add:
-
½ teaspoon chili flakes
-
Sliced fresh chili or jalapeño
Lemon-Forward
Replace ¼ cup vinegar with fresh lemon juice and add lemon peel.
No-Sugar Version
Skip sweetener entirely and add:
-
A splash of orange juice or grape juice
-
Or simply embrace the tang—still delicious
Garlic Lover’s Version
Double the garlic and lightly smash cloves for stronger infusion.
Common Mistakes to Avoid
-
Over-boiling the brine → dull flavor
-
Using iodized salt → cloudy brine
-
Skipping herbs → flat taste
-
Cutting vegetables unevenly → inconsistent texture
-
Leaving vegetables exposed to air → faster spoilage
Storage & Food Safety
-
Always store refrigerated
-
Use clean utensils when serving
-
If brine becomes cloudy or smells off, discard
-
Best consumed within 3 weeks
Why This Recipe Works Every Time
It’s all about balance:
-
Acid + salt for preservation
-
Sugar to round sharp edges
-
Herbs for freshness
-
Olive oil for Mediterranean richness