This cake is a wonderful example of how simple ingredients can create something rich, moist, and satisfying without added sugar or flour. The natural sweetness comes entirely from apples, while cocoa gives it a deep chocolate flavor. Eggs provide structure and lightness, and baking powder helps the cake rise into a soft, sliceable loaf.
This recipe is especially popular with people who want a lighter dessert, a healthier snack, or a simple homemade cake using pantry ingredients. It is not a traditional sponge cake and not a brownie—it sits somewhere in between: tender, slightly dense, moist, and deeply cocoa-flavored.
Ingredients (Exactly as Requested)
-
Sweet apples – 4 medium
(Choose naturally sweet varieties; see apple guide below) -
Eggs – 4 large, at room temperature
-
Unsweetened cocoa powder – 5 tablespoons
-
Baking powder – 1 teaspoon
-
Olive oil – for greasing the mold only
That’s it. No sugar, no flour, no milk, no butter.
Equipment You’ll Need
-
Blender or food processor (very important for smooth texture)
-
Mixing bowl
-
Silicone spatula or spoon
-
Fine grater or knife (if prepping apples manually)
-
Loaf pan or small rectangular baking mold
-
Baking paper (optional but recommended)
-
Oven
-
Cooling rack or plate
Choosing the Right Apples (Very Important)
Since apples are the only source of sweetness, choosing the right type matters a lot.
Best Apple Varieties for This Recipe
-
Fuji
-
Gala
-
Honeycrisp
-
Pink Lady
-
Golden Delicious
These apples are naturally sweet and slightly aromatic, which balances the bitterness of cocoa.
Apples to Avoid
-
Granny Smith (too tart)
-
Bramley
-
Very green or underripe apples
If your apples are not sweet enough, the cake will taste quite bitter because cocoa powder has no sugar at all.
Step 1: Prepare the Apples
-
Wash the apples thoroughly.
-
Peel them completely. Apple skins can make the texture grainy.
-
Remove the cores and seeds.
-
Chop the apples into medium-sized chunks.
Texture Tip
The smoother your apple purée, the softer and more cake-like the final result will be. Large apple pieces will create a chunky, pudding-like texture instead of a cake crumb.
Step 2: Make Apple Purée
Place the chopped apples into a blender or food processor.
Blend until you get a very smooth, thick purée, similar to baby food or applesauce.
There should be no visible chunks.
If your blender struggles:
-
Add 1–2 tablespoons of water only if absolutely necessary.
-
Do not add juice or sweeteners.
Set the purée aside.
Step 3: Prepare the Eggs
Crack the 4 eggs into a mixing bowl.
Using a whisk or fork:
-
Beat the eggs until they are well combined
-
You don’t need to whip them to stiff peaks
-
Aim for a uniform, slightly frothy mixture
Why Eggs Matter Here
Since there is no flour:
-
Eggs provide structure
-
They trap air during baking
-
They help the cake hold together when sliced
Room-temperature eggs work best because they mix more evenly with the apple purée.
Step 4: Combine Wet Ingredients
Add the apple purée to the beaten eggs.
Mix slowly and thoroughly until fully combined.
The mixture should look smooth, glossy, and slightly thick.
Take your time here—this step determines the cake’s final texture.
Step 5: Add Cocoa Powder
Sift the 5 tablespoons of unsweetened cocoa powder directly into the mixture.
This prevents lumps and ensures even chocolate flavor.
Gently fold the cocoa in until:
-
The color is evenly dark brown
-
No dry cocoa pockets remain
Cocoa Tip
Natural unsweetened cocoa is preferred.
Dutch-processed cocoa can work but may produce a slightly milder flavor.
Step 6: Add Baking Powder
Add 1 teaspoon of baking powder.
Mix gently but thoroughly.
Do not overmix at this stage—just ensure it’s evenly distributed.
Baking powder is the only leavening agent, so even mixing is important for proper rise.
Step 7: Prepare the Baking Mold
-
Lightly grease the mold with olive oil.
-
Optionally line the bottom with baking paper for easier removal.
-
Pour the batter into the mold.
-
Smooth the top with a spatula.
Tap the mold gently on the counter once or twice to release air bubbles.
Step 8: Baking
Preheat your oven to 170°C (340°F).
Place the mold on the middle rack.
Bake for 40–45 minutes.
How to Check Doneness
-
Insert a toothpick or knife into the center.
-
It should come out mostly clean, with maybe a little moisture but no liquid batter.
-
The top should feel firm but spring back slightly when touched.
Do not overbake, or the cake will become dry.
Step 9: Cooling
Remove the cake from the oven.
Let it cool:
-
In the mold for 10–15 minutes
-
Then remove and cool completely on a rack or plate
Cooling is essential. The cake continues to set as it cools, and slicing too early may cause it to crumble.
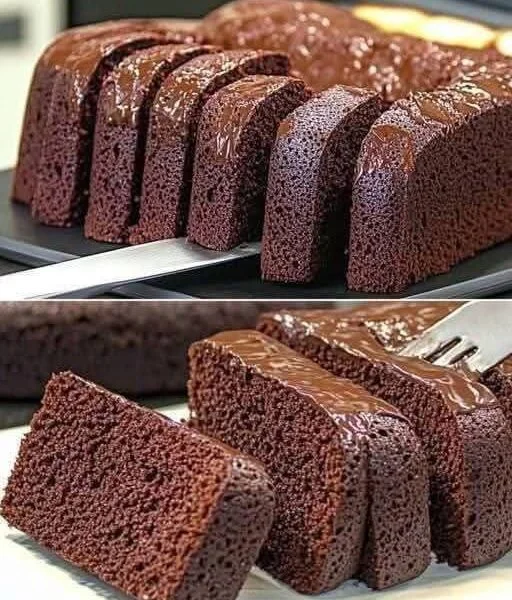
Texture and Flavor Description
-
Texture: Moist, soft, slightly dense, smooth crumb
-
Flavor: Deep cocoa with gentle apple sweetness
-
Sweetness level: Mild and natural
-
Aftertaste: Clean, not sugary
This is not a dessert that tastes like candy—it tastes like real food.
Storage Instructions
Refrigerator
-
Store in an airtight container
-
Keeps well for 3–4 days
-
Flavor improves after the first day
Freezer
-
Slice before freezing
-
Wrap slices individually
-
Freeze up to 1 month
-
Thaw at room temperature
Serving Suggestions (Optional)
-
Plain, as-is
-
Light dusting of cocoa powder
-
With unsweetened yogurt
-
Slightly warmed for a softer texture
Common Mistakes to Avoid
-
Using sour apples – results in bitter cake
-
Not blending apples enough – grainy texture
-
Overbaking – dry, rubbery cake
-
Skipping sifting cocoa – clumps in batter
-
Cutting while hot – cake falls apart
Variations (Optional, Still Sugar-Free)
If you ever want to experiment:
-
Add cinnamon or vanilla (tiny amounts)
-
Mix apple varieties for deeper flavor
-
Use silicone molds for individual portions
Final Thoughts
This apple and cocoa cake proves that baking doesn’t always need sugar, flour, or complicated ingredients. With careful technique and good apples, you can create a satisfying, everyday cake that feels comforting and nourishing.