A sweet, savory, and satisfying dinner baked into a crisp-tender bell pepper—easy, colorful, and W-W-adaptable!
Prep Time: 30 minutes · Cook Time: 35 minutes · Total Time: 1 hour 5 minutes
Servings: 4 stuffed peppers
Dietary Tags: High-Protein · Gluten-Free Optional · W-W-Friendly
✅ Ingredients Checklist
-
Boneless, skinless chicken breasts (1 lb, cut into 1-inch cubes)
-
Teriyaki sauce (½ cup)
-
Pineapple juice (¼ cup)
-
Cornstarch (1 tbsp)
-
Vegetable oil (1 tbsp)
-
Large bell peppers (4, any color)
-
Cooked white rice (1 cup)
-
Pineapple chunks (1 cup, fresh or canned in juice)
-
Chopped green onions (¼ cup)
-
Salt & black pepper
-
Optional: Sesame seeds, extra green onions for garnish
🥄 Cooking Instructions
-
Marinate chicken with teriyaki sauce, pineapple juice, and cornstarch. Chill 30 min–2 hrs.
-
Cook chicken in skillet over medium-high with oil for 5–7 min until browned and cooked through.
-
Prep bell peppers by cutting tops off and removing seeds/membranes.
-
Cook rice (or use pre-cooked rice).
-
Mix filling: Combine cooked chicken, rice, pineapple, green onions. Season to taste.
-
Stuff peppers generously with chicken mixture.
-
Bake at 375°F for 20–25 min until peppers are tender.
-
Garnish with sesame seeds and more green onions. Serve hot!
💡Quick Tips
-
Use leftover rice for faster prep.
-
Lighten it up: use low-sodium teriyaki sauce and less oil.
-
Bell peppers should stand upright—trim bottoms slightly if needed.
I. Why “Recipe-First”?
We keep it practical. Cooking time, ingredients, instructions—all up top so you can dive into the recipe. Scroll down for tips, swaps, and W-W customizations.
II. Introduction
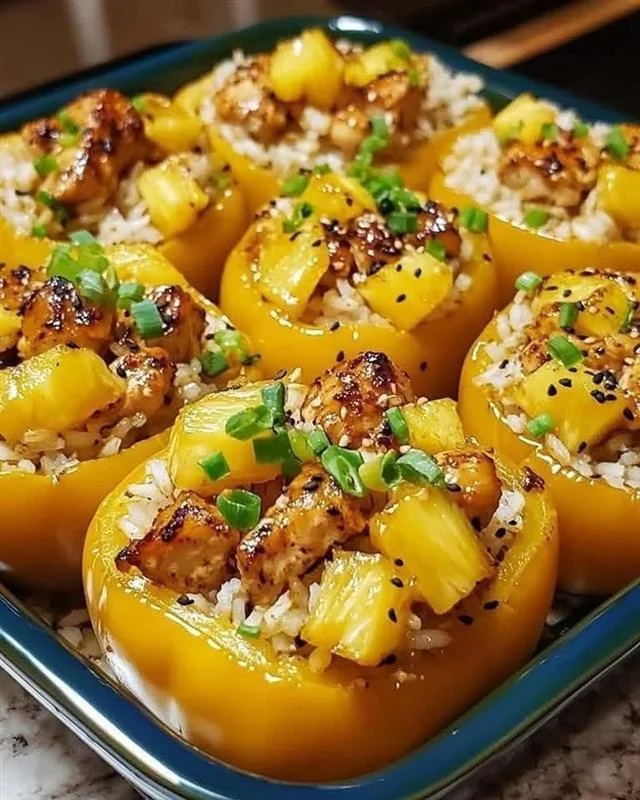
Stuffed peppers are one of my all-time favorite meal-prep go-tos, but this tropical twist is something special. Tender chicken coated in sticky teriyaki, sweet pineapple chunks, and fluffy rice all tucked inside vibrant bell peppers—it’s a complete meal in one, and with W-W-friendly options, you can enjoy it guilt-free!
III. Step-by-Step Cooking Guide
1. Marinate & Prep
-
In a bowl, whisk together teriyaki sauce, pineapple juice, and cornstarch.
-
Add cubed chicken, mix to coat, and refrigerate 30 minutes–2 hours.
-
TIP: This marinade tenderizes the chicken and creates a glossy finish when cooked.
2. Sear the Chicken
-
Heat oil in a skillet or wok over medium-high.
-
Add marinated chicken and cook for 5–7 minutes, stirring occasionally, until fully cooked.
-
Set aside to cool slightly.
3. Prepare the Peppers
-
Cut tops off the bell peppers and remove seeds and membranes.
-
Arrange upright in a baking dish.
-
TIP: Choose peppers with flat bottoms or slice a tiny bit off to help them stand.
4. Cook the Rice
-
Use leftover rice, or cook ½ cup dry rice according to package directions (yields ~1 cup cooked).
-
Want more nutrition? Try brown rice or quinoa.
5. Mix the Filling
-
In a large bowl, mix cooked chicken, rice, pineapple chunks, and green onions.
-
Season with salt and pepper. Adjust seasoning to taste.
6. Stuff & Bake
-
Fill each bell pepper with the chicken-rice mixture.
-
Cover loosely with foil and bake at 375°F for 20–25 minutes until peppers are tender and filling is hot.
7. Finish & Serve
-
Garnish with sesame seeds and extra green onions.
-
Serve hot with a side salad or sautéed greens for a complete meal.
IV. Ingredient Notes & Substitutions
-
Chicken: Breast is lean and protein-rich. Thighs are juicier if you prefer.
-
Teriyaki Sauce: Use low-sodium or homemade to reduce salt content.
-
Rice: White, brown, jasmine, or even cauliflower rice all work here.
-
Pineapple: Fresh or canned in juice—not syrup.
-
Bell Peppers: Use a mix of colors for extra eye appeal and antioxidants.
Smart Swaps
-
Use quinoa or riced cauliflower instead of white rice for lower carbs.
-
Add chopped water chestnuts or shredded carrots for crunch.
-
Want it spicy? Stir in chili flakes or sriracha to the filling.
V. Serving & Pairing Ideas
-
Side Salad: Try with cucumber sesame salad or a W-W miso slaw.
-
Sauce Drizzle: A little extra teriyaki or low-fat yum yum sauce on top.
-
Portion Hack: Half a pepper for light eaters or pair with soup.
VI. Storage & Make-Ahead Tips
-
Fridge: Store cooked stuffed peppers in an airtight container for up to 4 days.
-
Reheat: Microwave covered for 2–3 minutes or oven-bake at 350°F until heated through.
-
Make-Ahead: Prepare filling in advance and store separately. Assemble & bake when ready.
VII. Nutrition Info (Approx. per stuffed pepper)
-
Calories: 360
-
Protein: 26 g
-
Carbs: 30 g
-
Fat: 13 g
-
Fiber: 3 g
-
W-W Points: ~6–8 (depends on teriyaki brand and rice type)
Diet Tags: High-Protein · Gluten-Free Option · Dairy-Free
VIII. Frequently Asked Questions
Q: Can I use ground chicken instead of diced?
A: Yes! Brown it first, then add marinade and simmer until it thickens.
Q: Can I freeze these?
A: Absolutely—freeze before or after baking. Wrap individually and store up to 3 months.
Q: What’s a low-carb alternative?
A: Use riced cauliflower or chopped cabbage instead of rice.
IX. Kristy’s Note
I created this recipe after a beach trip had me dreaming of pineapple, and my kids wanted “something fun with rice.” These peppers hit all the right notes—sweet, savory, and ultra-satisfying without a heavy food hangover. Plus, they look so pretty on the plate!
X. More Healthy Dinner Ideas
-
Sweet Chili Chicken Lettuce Wraps
-
W-W Teriyaki Meatballs with Pineapple Rice
-
Asian Chicken & Veggie Stir Fry Bowl
✨ Let’s Get Stuffed!
Tried this Teriyaki Pineapple Chicken & Rice Stuffed Peppers recipe? Snap a pic and tag @KristyCookRecipes on Instagram, or share your version below—I’d love to see how you made it your own