The Ultimate Snack Upgrade You Didn’t Know You Needed,
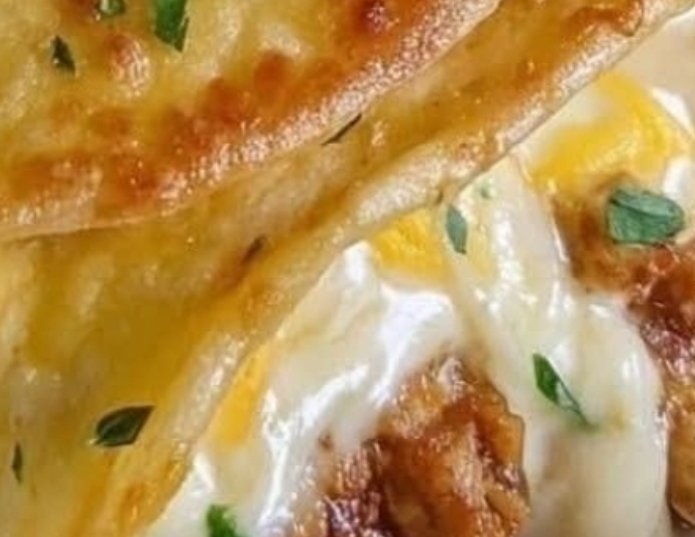
Introducing a snack that’s as bold as it is brilliant: Loaded Cheesy Pocket Tacos. Imagine a golden, crispy tortilla shell that’s warm on the outside and bursting with gooey, melty cheese, perfectly seasoned meat, and vibrant sautéed vegetables inside. Each bite is an explosion of flavor—savory, cheesy, satisfying. These aren’t just tacos… they’re cheesy pockets of joy you can hold in your hand.
Whether you’re hosting a game night, planning a party, or just need a seriously satisfying snack between meals, these hand-held creations are your new go-to. Crispy, creamy, and endlessly customizable, they’re the kind of snack that disappears faster than you can make them.
Why You’ll Love This Recipe
Crispy Outside, Gooey Inside – That perfect golden crunch gives way to warm, cheesy layers.
Packed with Flavor – Spiced meat, colorful veggies, and melted cheese in every bite.
Portable and Fun – Great for parties, kids, game days, or on-the-go meals.
Totally Customizable – Choose your protein, your cheese, your veggies, your flavor.
Snack or Meal – Serve them as appetizers or bulk them up into a full meal.
Ingredients
(Makes 6 pocket tacos)
6 large flour tortillas
1 lb ground beef (or shredded chicken, turkey, or black beans)
1 tbsp taco seasoning
1 cup shredded cheddar cheese
1 cup shredded mozzarella or pepper jack
1 cup bell peppers, diced
½ cup onions, diced
¼ cup salsa or taco sauce
2 tbsp olive oil or melted butter (for brushing)
Optional: jalapeños, corn, sour cream, guacamole, or fresh cilantro
How to Make Loaded Cheesy Pocket Tacos
Step 1: Prepare the Filling
In a skillet over medium heat, cook your ground beef with taco seasoning until browned and cooked through. Drain any excess fat. Stir in the diced peppers, onions, and salsa. Cook for another 2–3 minutes until veggies soften.
Step 2: Assemble the Pockets
Lay out a tortilla. On one half, layer some of the meat mixture, followed by shredded cheeses and any additional fillings you like (jalapeños, corn, etc.). Fold the tortilla in half to form a semi-circle and press edges together gently.
Tip: Don’t overfill or they’ll burst while cooking—leave a small border around the edge.
Step 3: Crisp Them Up
Brush each pocket lightly with olive oil or melted butter. Place in a skillet or on a griddle over medium heat. Cook 2–3 minutes per side, pressing slightly with a spatula, until both sides are golden brown and crispy.
Step 4: Serve Hot
Slice in half, serve with sour cream, guacamole, extra salsa—or just enjoy them as-is!
Variations to Try
Smoked Turkey & Swiss: Sub beef for smoked turkey and use Swiss cheese for a deli-style twist.
Spicy Bean & Jalapeño: Use black beans and pepper jack for a vegetarian version with kick.
Buffalo Chicken: Mix cooked shredded chicken with buffalo sauce and ranch dressing.
Breakfast Pocket: Fill with scrambled eggs, sausage, and cheese for a morning treat.
Storage & Reheating
Store: Refrigerate in an airtight container for up to 3 days.
Freeze: Wrap individually and freeze for up to 1 month.
Reheat: Bake at 350°F or use an air fryer to keep the shell crispy.
Final Thoughts
Loaded Cheesy Pocket Tacos aren’t just snacks—they’re a celebration of flavor wrapped in crispy, golden perfection. They’re the kind of recipe you’ll want to keep in rotation because everyone loves them—and they never get boring.
So go ahead, get cheesy, get crispy, and enjoy every bite.