I. Recipe Card
🍰 Recipe Title & Tagline
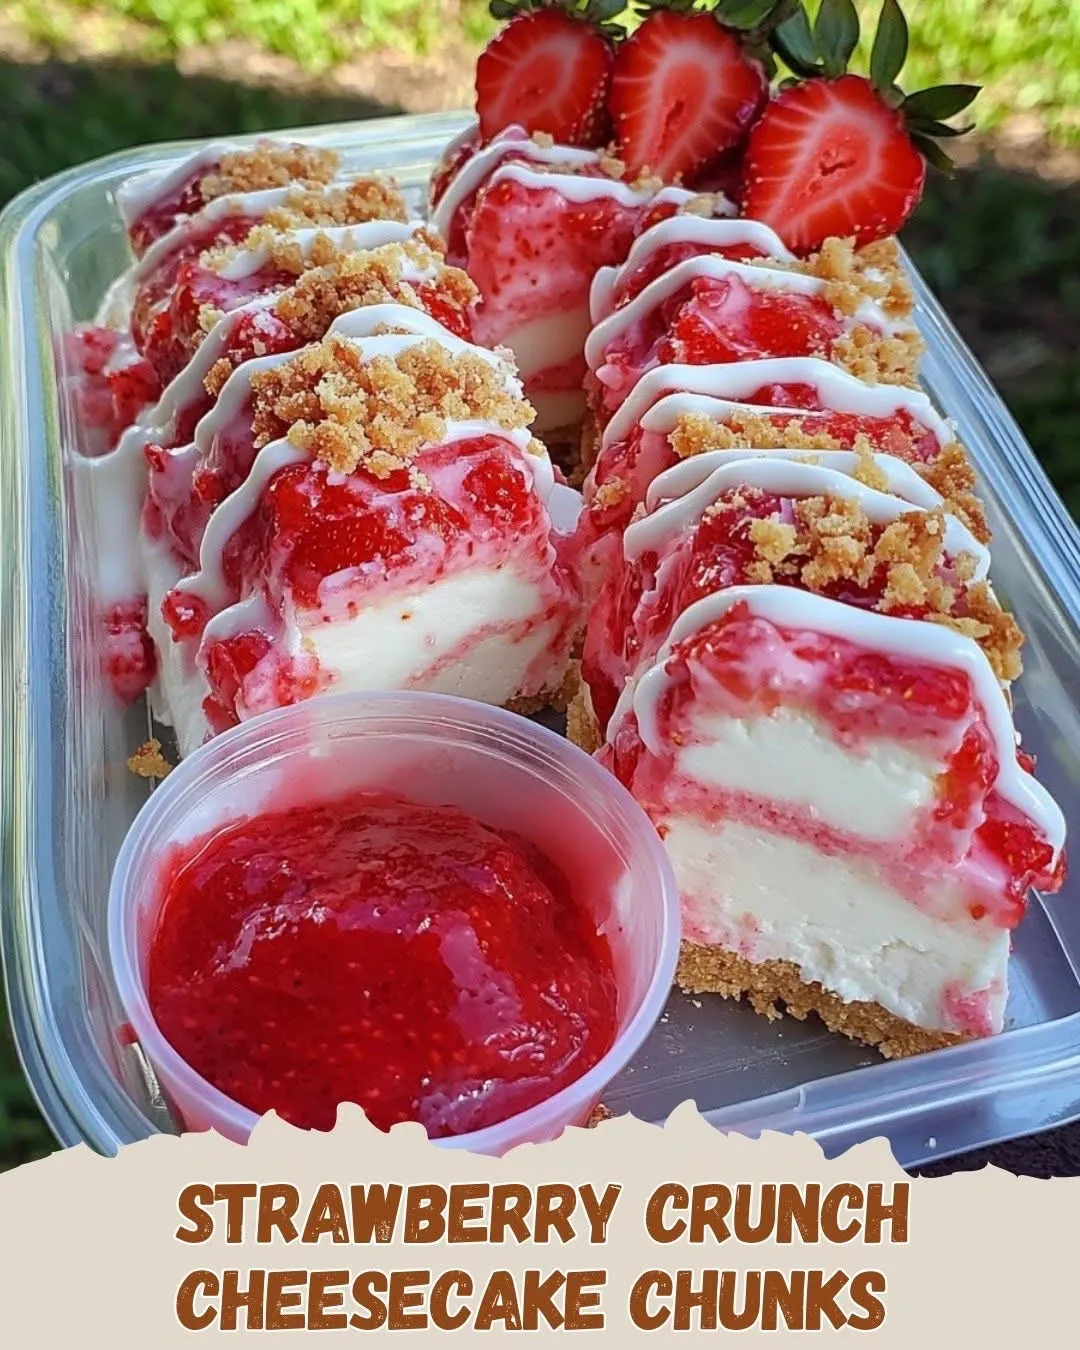
Strawberry Crunch Cheesecake Chunks – luscious mini cheesecake bites topped with crispy strawberry crunch for a fresh, fun twist.
Servings & Timing
-
Yield: ~24 chunks
-
Prep Time: 20 minutes
-
Cook Time: 50–55 minutes total
-
10 minutes crust bake
-
40–45 minutes cheesecake bake
-
-
Chill Time: ≥4 hours (or overnight)
-
Dietary Badges: Vegetarian, not gluten-free unless using GF Oreos, no refined chocolate
Ingredients Checklist
-
Graham cracker crumbs
-
Unsalted butter, melted
-
Cream cheese, softened
-
Granulated sugar
-
Large eggs
-
Vanilla extract
-
Golden Oreos (crushed)
-
Freeze-dried strawberries (or strawberry gelatin mix)
-
Fresh strawberries, diced
-
Lemon juice
-
White chocolate, melted
Instructions (Concise)
-
Make crust: Combine graham crumbs + melted butter → press into pan; bake 10 minutes.
-
Bake cheesecake: Beat cream cheese + sugar → add eggs, vanilla → pour over crust → bake 40–45 minutes → cool + chill.
-
Mix crunch: Stir crushed Oreos + dried strawberries + butter; set aside.
-
Cook sauce: Simmer fresh strawberries + sugar + lemon juice; cool.
-
Assemble chunks: Cut cheesecake → drizzle with sauce → sprinkle crunch → drizzle white chocolate.
Additional Notes:
-
Use ripe, fragrant fresh strawberries for best flavor in sauce.
-
Replace freeze-dried strawberries with strawberry gelatin for color & extra tang.
-
Perfect make-ahead dessert – refrigerate overnight!
II. Brief Introduction
Meet your new show-stopping dessert: bite-sized cheesecake similar to a full-size version—but easier to eat and share! Inspired by warm afternoons and fresh strawberries, this recipe combines creamy cheesecake with a playful crunch and a tangy strawberry sauce—perfect for spring gatherings or weekend indulgence. Confession: I once hid an entire tray from my kids—I just couldn’t stop sampling!
III. Step-by-Step Cooking Guide
1. Crust Prep & Bake
-
What to do: Mix 2 cups graham crumbs with ½ cup melted unsalted butter. Press firmly into your lined 9×13 pan for a sturdy base. Bake at 325°F for 10 minutes.
-
Tip: Use the bottom of a measuring cup to really press crumbs tight—it ensures no soggy bottom later.
2. Cheesecake Filling & Bake
-
What to do: Beat 3 (8‑oz) cream cheese packs with 1 cup sugar until ultra‑smooth. Add 3 eggs one at a time, then 1 tsp vanilla. Pour over cooled crust. Bake for 40–45 minutes until edges are set but the center jiggles slightly.
-
Tip: Room‑temperature eggs = smoother filling. Don’t open the oven too early to avoid cracking!
3. Chill the Cheesecake
-
Let the cheesecake cool to room temp, then refrigerate uncovered for at least 4 hours or overnight.
-
Tip: Cover only after fully chilled to prevent condensation.
4. Strawberry Crunch
-
Combine 1½ cups crushed golden Oreos, ½ cup crushed freeze‑dried strawberries (or sprinkle in strawberry gelatin for extra flavor), and 3 Tbsp melted butter.
-
Tip: Use a zip‑top bag and rolling pin to crush Oreos right in the bag—easy cleanup!
5. Strawberry Sauce
-
Simmer 1½ cups diced fresh strawberries with ½ cup sugar and 1 Tbsp lemon juice for about 5–7 minutes until thickened. Let cool.
-
Tip: Mashing with the back of a spoon gives a rustic, saucy texture—feel free to blend for a smoother sauce.
6. Assemble & Decorate
-
Cut the cheesecake slab into ~24 chunky bites.
-
Drizzle each with cooled sauce.
-
Top generously with strawberry crunch.
-
Finish with a drizzle of melted white chocolate for a beautiful, sweet finish.
-
Tip: Melt white chocolate in 15‑second bursts in the microwave, stirring in between to avoid burning.
IV. Ingredient Details & Substitutions
-
Graham cracker crumbs: Use finely crushed for a tender crust. Gluten‑free crackers are an easy swap.
-
Cream cheese: Full‑fat yields the creamiest texture; low‑fat works but may alter consistency.
-
Golden Oreos: Provide sweet vanilla crunch; swap for gluten‑free Oreos if needed.
-
Freeze-dried strawberries: For intense berry flavor and color. Can substitute strawberry gelatin powder for sweetness and pink hue.
-
Fresh strawberries: Essential for bright, fresh sauce—choose ripe, fragrant ones.
-
White chocolate: Adds sweetness and pretty contrast—omit or use dark chocolate drizzle if preferred.
Substitution Tips:
-
No vanilla? Use ½ tsp almond extract for a nutty twist.
-
Dairy-free? Swap cream cheese with vegan cream cheese, and use dairy-free “white chocolate.”
-
Nutty crunch variation: Mix in chopped almonds or pecans with the Oreo layer.
Equipment Alternatives:
-
No electric mixer? A sturdy whisk with elbow grease can handle the filling.
-
No 9×13 pan? Use a 9‑inch square or rectangular pan—bake times remain nearly identical.
V. Recipe Variations & Serving Suggestions
Flavor Twists:
-
Lemon-berry: Add 1 Tbsp lemon zest to the cheesecake batter for a citrusy lift.
-
Chocolate swirl: Toss ¼ cup melted dark chocolate into the batter before baking for a marbled look.
Dietary Variations:
-
Gluten-Free Version: Use GF graham crackers and GF Oreos; the rest is naturally GF.
-
Vegan-Friendly: Use plant‑based cream cheese and dairy-free butter/chocolate (will slightly adjust texture).
Serving & Pairing:
-
Serve with a glass of sparkling rosé or fruity iced tea.
-
Add garnishes like fresh mint leaves or extra freeze‑dried strawberry pieces.
-
For celebrations, plate chunks on dessert spoons or mini plates for an elegant bite-sized treat.
VI. Storage & Make-Ahead
Refrigeration:
-
Cover chilled cheesecake chunks with plastic wrap or store in an airtight container. They stay fresh for up to 5 days—if they last that long!
Freezing:
-
Flash‑freeze bites on a tray, then transfer to a freezer-safe bag for up to 2 months. Thaw overnight in the fridge, then drizzle sauce before serving.
Reheating:
-
Serve cold—no reheating needed—but you can warm the strawberry sauce slightly before drizzling if desired.
Make-Ahead Tips:
-
Prep weather sauce and crunch up to 2 days ahead—just keep chilled separately.
-
Bake the crust and filling the day before, and assemble right before serving for minimal last‑minute prep.
VII. Nutrition Per Serving (approx.)
| Nutrient | Per Chunk (~24) |
|---|---|
| Calories | ~210 kcal |
| Carbohydrates | ~20 g |
| Protein | ~4 g |
| Fat | ~12 g |
| Fiber | ~1 g |
| Sugar | ~17 g |
Dietary Highlights:
-
Vegetarian, Gluten-Free option, High in calcium (from cream cheese)
-
Contains dairy and gluten (unless using substitutes)
VIII. Frequently Asked Questions
Q: Can I bake in a round pan instead?
A: Absolutely! A 9‑inch round works fine—just check doneness 5 minutes earlier as depth may differ.
Q: Can I skip chilling?
A: You need at least 4 hours chilling to set well—serving too soon may result in falling-apart chunks.
Q: Sauce too runny?
A: Simmer a bit longer, or stir in a whisked slurry of 1 tsp cornstarch + 1 Tbsp water.
Q: Idea for egg-free version?
A: Replace each egg with ¼ cup applesauce or a flax‑egg (1 Tbsp ground flaxseed + 3 Tbsp water).
Q: My cheesecake cracked—tips?
A: Avoid overmixing, don’t open oven while baking, and try a water bath next time for gentler heat.
IX. Personal Story & Author’s Note
I created this recipe when my kids and I needed a fun make-ahead dessert for their school potluck. We all agreed these little beauties are irresistible—the combo of creamy, sweet, tart, and crunchy is pure joy. As a W-W expert, I love offering something that feels indulgent while staying portion-friendly and crowd-pleasing. Kristy-approved, tested, and loved in our home!
X. More Healthy Dessert Ideas
-
Mini Lemon Ricotta Cheesecakes – bright, creamy, and citrusy
-
Berry-Filled Chia Seed Pudding Parfaits – layered, nutrient-packed treats
-
No-Bake Oatmeal Chocolate Energy Bites – blissfully easy and portable
XI. Call to Action
Can’t wait for you to try these Strawberry Crunch Cheesecake Chunks! Tell me how they turned out—share your photos or rate this recipe below. And don’t forget to tag me on Instagram @KristyCookRecipes when you make them—let’s spread the love and sweetness! ❤️